
by Deborah Healey
This tip has suggestions both for those with a one-computer classroom and for those whose students have access to a lab. It focuses on features of Microsoft Word and PowerPoint, but other productivity tools have similar capabilities. This tip was inspired by a presentation given by Jim Mischler in 2001. It has been updated from the March 2002 Tech Tip.
Adding artwork
Word and PowerPoint have built-in clip art. You can download more online at Microsoft's Design Gallery Live. Note to non-Internet Explorer users - you'll need to use Internet Explorer to save the clip art to Word and PowerPoint correctly. Often more helpful, though, are clip art CD-ROMs. I would strongly suggest getting a clip art collection that comes with a book. It's much easier to page through print looking for something that catches your eye. Of course, there are vast quantities of clip art on the web, as well, but that's a topic for another time.
Other very nifty features
Insert comments
If you have students give you their work in electronic form, you have
several additional options. In Office 97/98, the Insert menu includes Insert Comment. In Office 2007, it's on the Review ribbon. To
use this, highlight the word or phrase that you want to comment on, then
select Insert -> Comment. You'll have a box at the bottom in which to
write your comment, then click Done when you are finished. The text will
show a colored highlight (mine is yellow) where there are comments. The
student can move a cursor over the text to read the comment, or
right-click (hold the mouse button or Control+click on a Macintosh) to
edit or delete the
comment. Advantages for the teacher: your comments can be as long as you
like, and you do not destroy the integrity of the student's text with
the comments. You can also edit your comments at will. It is possible to
add a recorded comment, but that feature works best in Office 97/98. Click here to download a PDF that explains the process of adding that option to Office 2007. It is more complicated in Office 2008 on the Mac, to the point where it's almost not worthwhile. You will need to choose between the format that you have and the recorded comment, since you need to shift to Notebook layout.
Track changes
Here is another option that can be very helpful for teachers and peer
editors. Track changes lets you have a visual record of changes made to
a document. Start by going to the Tools menu in Office 97/98 and the Review ribbon in Office 2007. In Office 97/98, choose Track Changes
-> Highlight changes. Click to put a check mark in the Highlight changes
box, which will turn highlighting on. In Office 2007, just click on the Track Changes icon. From here until you turn Track
changes off, you will see additions in color and underlined, deletions
marked in color with strike-throughs, and a mark in the margin showing
where changes have occurred. In a one-computer class, this can be used
to demonstrate the writer's editing process, using a text supplied by
the teacher. When the same document is edited on different computers,
the changes show up in different colors. This makes it easy to see who
did what in a document. The next step is to select Accept or reject
changes from the Tools -> Track changes menu or the Review ribbon. The user can decide with
each change whether to accept or reject it. With each decision, the
highlighting disappears.
Track changes can be combined with Insert comments in process writing so that students can show the teacher how they responded to comments. The student could turn Track changes on, make the changes, and print out the marked copy. The student can then go through and clean up the text, print the cleaned up version, and hand in both copies.
If you're using both Track changes and Insert comments, watch out - you need to turn Track changes off before you'll be able to delete a comment.
AutoSummarize
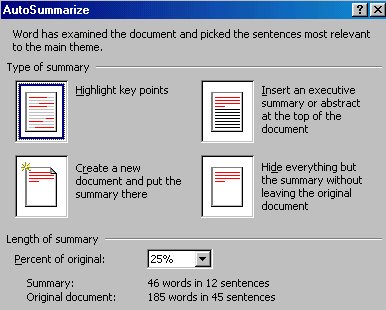 This is a tool teachers should know
about, since their students probably do. In Windows 97/98, you can just open a document, then select
AutoSummarize from the Tools menu. You'll see options to show the
summary within the document ("highlight key points"), put the summary at
the head of the document, create a separate document with the summary,
or hide the document except for the summary. To show students about
summarizing in a one-computer class, it's helpful to choose "highlight
key points" and go through them, having students decide whether they
would have made the same choice as the computer did. If you create a
separate document, it's easier to compare the two print documents in a
small group or individual setting. As mentioned above, it's good for us
as teachers to know about this option, since our students are probably
using it to write their summaries.
If you are using Windows 2007, it is more complicated. Click here to download a PDF that explains the process. Once AutoSummarize is enabled, it functions in the same way as in Office 97/98.
This is a tool teachers should know
about, since their students probably do. In Windows 97/98, you can just open a document, then select
AutoSummarize from the Tools menu. You'll see options to show the
summary within the document ("highlight key points"), put the summary at
the head of the document, create a separate document with the summary,
or hide the document except for the summary. To show students about
summarizing in a one-computer class, it's helpful to choose "highlight
key points" and go through them, having students decide whether they
would have made the same choice as the computer did. If you create a
separate document, it's easier to compare the two print documents in a
small group or individual setting. As mentioned above, it's good for us
as teachers to know about this option, since our students are probably
using it to write their summaries.
If you are using Windows 2007, it is more complicated. Click here to download a PDF that explains the process. Once AutoSummarize is enabled, it functions in the same way as in Office 97/98.
Why are these helpful? I've noticed that I can tell students repeatedly about the elements of a good presentation, including organizational schemes. They may or may not listen. The template provides them with an outline that gives the same recommendations, and they follow them. In addition to being better organized, PowerPoint shows are a lot more readable. It's hard to force PowerPoint to use type that is too small to read.
I am no Microsoft fan, but I do like finding something that makes my job easier. These built-in aids to products most of us have on our desktops can make teaching writing and speaking a little bit better. This is why we use computers, right?
Please feel free to email me with questions and comments -- and suggestions for other tech tips -- at dhealey at uoregon dot edu.
Happy emailing!
https://www.deborahhealey.com/may2009.html
Last updated 6 May 2009 by D. Healey,
dhealey at uoregon dot edu